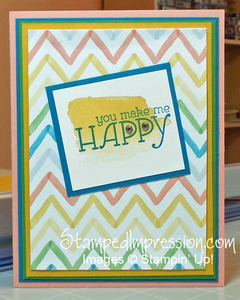
Today’s Tip: Add lots of card stock layers to your card. When you choose your colors carefully, it always adds so much to the card design!
 This card was so simple to make. It literally took me less than 10 minutes!
I started with the sentiment watercolor smudge from the Happy Watercolor stamp set in the Occasions catalog. Love it!
Then I considered placing it on the sheet of Watercolor Wonder Designer Series Paper. (Why, or why, have I kept this paper pack out of sight for so long?!?!)
The colored chevron on the paper made it easy. I just picked up colors from it and layered card stock under.
Here are the steps, so that you can follow along:
Use the photo to see the placement of the different elements. Unless stated otherwise, I used SNAIL Adhesive for all gluing.
- Cut 5-1/2″ x 8-1/2″ card base from Crisp Cantaloupe card stock. Score at 4-1/4″ and fold on teh scored line.
- Cut 4″ x 5-1/4″ from Island Indigo card stock. Layer on card front.
- Cut 3-7/8″ x 5-1/8″ from Gumball Green card stock. Layer on card front.
- Cut 3-3/4″ x 5″ from Crushed Curry card stock. Layer on card front.
- Cut 3-1/2″ x 4-3/4″ from Designer Series Paper. Layer on card front.
- Cut 2″ x 2-1/4″ from Whisper White card stock. Stamp smudge in Crushed Curry ink and the sentiment in Island Indigo ink.
- Cut 2-1/4″ x 2-1/2″ from Island Indigo card stock. Attach the stamped card stock on top. Add the entire piece to the card front.
- Insert a Rhinestone Basic Jewel in the center of each “P”.
That’s all there is to it! Looks great, as long as you add lots of card stock layers!

