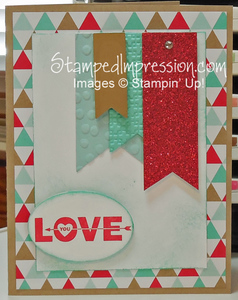
It’s Valentine’s Day and I’d like to show dh (aka Dear Husband) just how much he means to me. This card says, “I Love You to the Moon & Back!”
 I started with the sentiment from Love You to the Moon. While intended as a Valentine, I found that sentiments in this stamp set can be used all year long!
I punched out the sentiment, using the Large Oval Punch, sponged the edges, and attached to the card base with Stampin’ Dimensionals.
I created some banners made by running card stock through the Big Shot Die-Cutting Machine with different Banners Framelits Dies. (The one at the back was trimmed a little to make it shorter.)
Finally, for that POP, I made one banner from Red Glimmer Paper and added a Rhinestone Basic Jewel at the top. The banners were also attached to the card front using Stampin’ Dimensionals.
There is so much to talk about this card, but here are my Top 3 Tips:
- I can be pretty conservative in choosing my colors. However, I wanted to pick something not-so-traditional for Valentine’s Day. I used a sheet from Fresh Prints Designer Series Paper Stack. All colors on my card were taken from this paper! This is an easy was to choose colors for your project!
- Once again sponging saved my card design. I used it to make the oval stand out. I also used it to fill empty space on the card base. Embossing or more stamping would have been too busy.
- You can never use too many Stampin’ Dimensionals. I used one under each banner. That made them stronger elements in the card design, than if I had just used some kind of flat adhesive. I love the depth of the banners, don’t you?
Well, now that I have my card made, it’s time to start planning our Valentine’s evening. I guess we’ll be watching the Olympics! Nothing says, “I Love You to the Moon & Back!” better than that!
Happy Valentine’s Day!!


My fav colors these days! great card!
Thanks! I’ll keep those colors in mind when working on projects for Card Class!