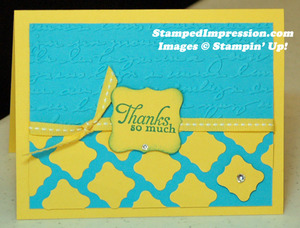
Have you been wondering how to use punches and negative space in your card designs? I’ve seen examples of this everywhere and decided to work on my own version. Take a look.
 Sometimes, I like to punch out a shape, then use the remaining card stock in my design. That card stock, which is missing the punched shape, is the negative space. However, due to the construction of our punches, it’s hard to punch a shape multiple times throughout a wide piece of card stock.
Here is what I did on this card. I used contrasting colors for my card base (Daffodil Delight) and the layer above it (Tempting Turquoise). Then I punched an interesting shape (with the Petite Curly Label Punch) 129405 from the same color as the card base. I carefully attached the punched shapes on the top layer, making a grid. When a punched piece extended beyond the edge, I trimmed it away.
With these bright color selections, the card was too hard on my eyes. So I sponges the edges of the shape holding the sentiment. I also used a Stampin’ Dimensional under it and one of the smaller shapes. The Rhinestone Basic Jewel highlights it!
by the way, did you notice the dry embossing at the top of the card? It was made using the Big Shot and the Pretty Print Textured Impressions Embossing Folder. That folder is new in the Holiday Catalog.
I think that my next card using this technique will have softer, maybe even neutral colors. What do you think? Try this the next time you try to use punches and negative space!


Nifty! And I just happen to have that cute little punch — and its big sister, too! Fun, fun fun!
This is so much fun to do. Vary the spaces. Vary the angles. You have to try it!